Lesson 14 of 16 · 35 min
Arduino Soil Moisture Sensor with an OLED Display
A capacitive soil moisture sensor outputs an analog voltage that falls as soil gets wetter — roughly 2.5 V in dry air and 1.3 V in water — so map(reading, DRY, WET, 0, 100) turns it into a percentage.
This lesson also runs on an interactive 3D board: wire it, press Run and watch the circuit respond.
Open the 3D lessonThe cheap blue resistive probes corrode within weeks because current passes through the soil and eats the electrodes. The capacitive version (v1.2, the one with the black coating) measures the soil as a dielectric instead: no exposed metal, no electrolysis, months of service from the same probe.
Its output is inverted compared with most sensors: dry soil gives a high reading, wet soil a low one. Measure your own probe in air and in a glass of water, put those two numbers in the sketch, and the map() call gives you a percentage that means something.
What you need
| Part | Qty | Notes |
|---|---|---|
| Arduino Uno R3 | 1 | A0 reads the probe, A4/A5 drive the screen |
| Capacitive soil moisture sensor v1.2 | 1 | 3.3–5.5 V, analog output |
| 0.96″ I²C OLED, SSD1306 | 1 | 128 × 64, address 0x3C |
| Breadboard + 6 jumpers | 1 | The OLED shares A4/A5 with I²C |
| A plant in a pot | 1 | Water it slowly; the probe needs a minute to settle |
How to wire it
Probe VCC → 5 V, GND → GND, AOUT → A0. OLED VCC → 3.3 V, GND → GND, SCL → A5, SDA → A4. Insert the probe to the line marked on the board, not deeper — the electronics at the top must stay dry.
| Pin | Connects to | What it does |
|---|---|---|
| 5V · GND | Sensor VCC and GND | Power for the soil sensor. |
| A0 | Sensor AOUT | Lower the wetter the soil is. |
| 3V3 · GND | OLED VCC and GND | The screen runs on 3.3 V. |
| SCL · SDA | OLED SCL and SDA | I²C: a clock and a data line (the same pins as A5 and A4). |
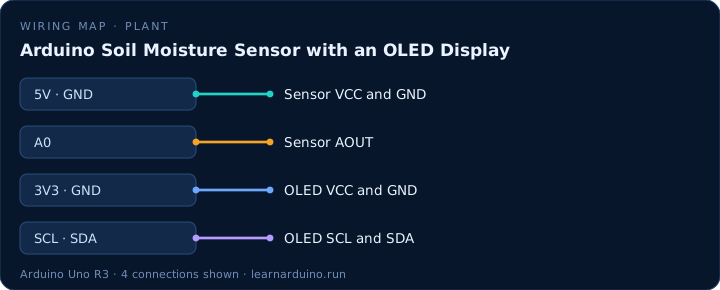
Reading an Arduino soil moisture sensor
Two families of sensor, two behaviours. A resistive probe pushes a small current through the soil and corrodes within weeks. A capacitive board treats the soil as a dielectric and lasts, which is why it is the one worth buying even though both output a 0–1023 analog value.
Which direction the number moves depends on the board: most capacitive sensors read high in air and low in a glass of water, resistive ones often the opposite. Do not assume — read it dry, read it in water, and write both numbers down. Those two points are the whole calibration.
Calibrating wet and dry for your own soil
Two-point calibration turns a raw number into a percentage: dry in air, wet in water, map() between them, constrain() to 0–100. The absolute numbers mean nothing across different boards and drift with supply voltage and soil salinity, so recalibrate when you change sensors — not when you change plants.
A 0.96″ SSD1306 OLED on A4/A5 puts the reading on screen without a laptop: two wires for I2C, the Adafruit_SSD1306 library, and the number is visible from across the room. Water with hysteresis — start below 30 %, stop at 45 % — so a pump does not chatter at the threshold, and do not leave a resistive probe powered continuously.
The sketch
#include <Wire.h>
#include <Adafruit_SSD1306.h>

const int SENSOR = A0;
const int DRY = 520;   // your reading in dry air
const int WET = 260;   // your reading in a glass of water

Adafruit_SSD1306 screen(128, 64, &Wire);

void setup() {
  Serial.begin(9600);
  screen.begin(SSD1306_SWITCHCAPVCC, 0x3C);
  screen.setTextColor(SSD1306_WHITE);
}

void loop() {
  int raw = analogRead(SENSOR);
  int moisture = constrain(map(raw, DRY, WET, 0, 100), 0, 100);
  Serial.println(moisture);

  screen.clearDisplay();
  screen.setTextSize(3);
  screen.setCursor(0, 0);
  screen.print(moisture);
  screen.print("%");

  // bar: full width = 100%
  screen.drawRect(0, 28, 128, 8, SSD1306_WHITE);
  screen.fillRect(0, 28, moisture * 128 / 100, 8, SSD1306_WHITE);

  screen.setTextSize(2);
  screen.setCursor(0, 46);
  if (moisture < 30) screen.print("Water me!");
  else if (moisture > 75) screen.print("Too wet!");
  else screen.print("Happy :)");

  screen.display();
  delay(500);
}
What the code does
- map(raw, DRY, WET, 0, 100) works even though DRY is larger than WET: it interpolates in either direction.
- constrain() keeps the result inside 0–100 when the soil is drier or wetter than your two calibration points.
- The SSD1306 library draws into a buffer; nothing appears until display() is called.
- Two thresholds, thirsty and soggy, give three states — the same hysteresis idea that stops the night light flickering.
Specifications
| Item | Value |
|---|---|
| Sensor | Capacitive soil moisture v1.2, 3.3–5.5 V |
| Output | About 2.5 V in dry air, 1.3 V in water |
| Screen | 0.96″ OLED, 128 × 64, SSD1306 |
| Bus | I²C, address 0x3C |
| Reading | Every 500 ms |
Common mistakes
- Using someone else’s calibration numbers. Every probe differs by hundreds of counts; measure yours in air and in water.
- Leaving the probe permanently powered in wet soil. Power it from a digital pin and switch it on only while measuring to double its life.
- Watering the electronics. Keep the top of the probe above the soil line and never pour water over the board.
Sources
The figures in this lesson come from these documents. Every value in the tables above can be checked against them.
- SSD1306 OLED controller datasheet (PDF)
- analogRead() — Arduino language reference
- Analog inputs — how the Uno's ADC works
Frequently asked questions
Why is a capacitive sensor better than a resistive one?
It has no exposed electrodes, so nothing corrodes and no current passes through the soil. A resistive probe in wet soil typically fails within weeks; a capacitive one lasts seasons.
What readings should a calibrated sensor give?
Around 520 in dry air and 260 in a glass of water for a typical v1.2 probe on a 5 V Arduino. Yours may be 480/250 or 600/300 — the pair matters, not the absolute values.
How often should I water based on the readings?
Treat the percentage as a trend, not a measurement. Most houseplants are happy between 30% and 70%; water when it drops below 30% and stop when it passes 60%.
Can I run this on a battery for months?
Yes, with changes: power the probe from a pin, read for 100 ms, then sleep the board with the watchdog timer. A bare ATmega328P in that design runs for over a year on three AA cells.
Want to see this circuit before you own the parts? The Arduino simulator draws this exact pin table on a 3D Uno R3: click any jumper to see what it carries, press Run and read the serial monitor.
Open the Arduino simulatorPublished 12 November 2026 · last updated 17 November 2026 · written and tested by Nick Hu.